Dataforce ASAP 11.8 Release Highlights
Invoice and Submission’s
Operator can now complete the submission or datafile/agent invoice in any order after appointment completion. Appointments now have 3 status settings.
- Completion Status (Waiting, Assigned, Completed - Partial/Field, Audited - Passed/Failed)
- Invoice Status (Invoiced - Field worker/Agent/Client)
- Submissions Status (Submitted - Pending/Partial/Failed/Accepted)
Extra Status fields have been added to the following Dataforce ASAP screens.
- Appointment/Job Advanced Search Filters and results.
- Appointment Summary screen.
- Job Appointment List screen.
- Job Summary Screen.
Dataforce Runabout will continue to lock appointments from changes for the following status’s:
- Submitted
- Invoiced
- Audited
Bulk Actions
Change submission status
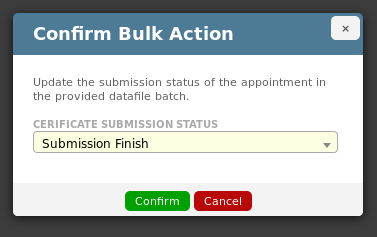
An operator can use this new bulk action to set a submissions response status (Pending/Accepted/Failed) for every appointment (or selected appointments) in a batch without needing to upload a Certificate Response File however if other submission attributes like submission date, failure reasons or portal identifier are to be recorded please continue to use the response file.
To use the action:
- Enter the batch number into the appointment search field.
- In the Job/Appointment Advanced Search fields click the ‘For Bulk Action’ drop-down and select Update Certificate Status.
- Clear the dates from the search fields to ensure all appointments in the submission batch are returned.
- Click Search.
- Select the appointment to update from the data-grid. (use ctrl/shift keys to select multiple)
- Click the Perform Bulk Update button at the bottom of screen.
- Select the status to change from the popup.
Other New Actions
- New bulk action added to create Field Audit Appointments.
- New bulk action to change appointments Invoice Eligibility Date.
Form Data Provider Updates.
- New form data provider for Recycling and Decommissioning Batches.
- New form data provider for Desktop Audit Question Block(s).
- Added new ROI and Graphs to the calculations data provider.
Split Submission and Invoice Eligibility Checks
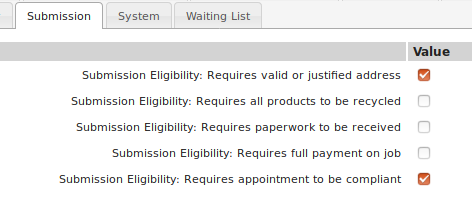
‘Invoice Eligibility’ has been split into ‘Invoice Eligibility’ and ‘Submission Eligibility’. Additional configuration parameters are now available to specify different settings for each.
To configure Invoice Eligibility Checks:
-
Navigate to (Configuration icon) Program Preferences Invoice Tab
-
Set fields that are prefixed with Invoice Eligibility:
To configure Submission Eligibility Checks:
-
Navigate to (Configuration icon) Program Preferences Submission Tab
-
Set fields that are prefixed with Submission Eligibility:
‘Invoice Eligibility’ rules will be used to determine the ‘Invoice Eligibility Date’ of an appointment. ‘Submission Eligibility’ rules will be used to determine the ‘Submission Eligibility Date’ of an appointment.
The new ‘Submission Eligibility’ rules will inherit their settings from the current ‘Invoice Eligibility Rules’ when migrating to this release.
Tag Groups
Split the tag option Ineligible for Invoice into two options:
- Ineligible for Invoice
- Ineligible for Submission.
Desktop Audit Updates
Additional access results have been introducted for Desktop Audits. These affect which operators can view and edit a desktop audit. If no visibility roles have been configured for an audit type the audit will be visible to all user roles.
For customers using Dataforce ASAP in an aggregation model this feature allows their own desktop audits to be restricted to view only or not visible to their agents.
Agent Email and Email Templates
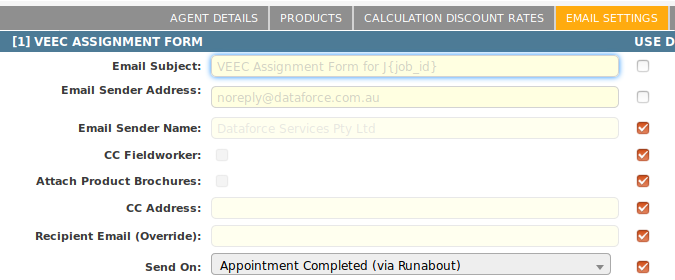
To speed the on-boarding process of new agents, you can now override settings on existing email configurations without creating a new Email Type. Field such as sender email, sender name, send on, subject and others can be overridden in the Agent settings.
To find this new screen:
- Open the Agents Register.
- Select the Agent you wish to modify and either double click or use Edit Agent button.
- Click on the tab ‘Email Settings’.
- Tick the checkbox on the right of the setting you wish to edit and change the setting.
- Click the Save Email Preferences button.
Custom email templates can now also be edited for an agent. These templates will replace the existing default email templates. Custom Images can also be upload and included in these email.
To find this new screen:
- Open the Agents Register.
- Select the agent you wish to modify and either double click or use Edit Agent button.
- Look for a tab called Email Templates.
- Select the email from the template dropdown.
- When finished click the Save Email Template button.
Agent Product Access Rules
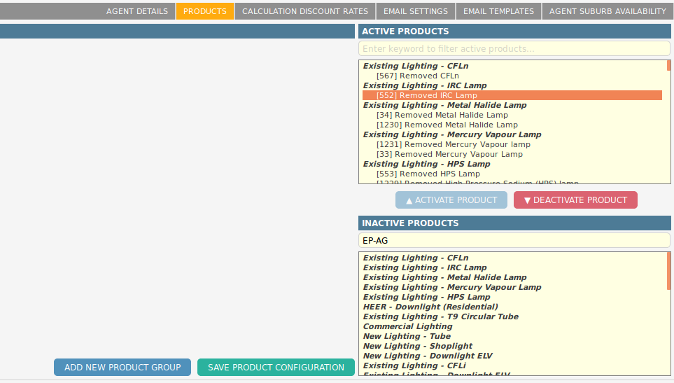
An Agents individual product access has been moved from the agent details tab into the ‘Products’ tab in the Agent profile.
Note: You can still control product access via the agent groups or from the product details tab in the product register
To add a product for this agent using this tab:
- Open the Agents Register.
- Select the agent you wish to modify and either double click or use Edit Agent button.
- Select the ‘Products’ tab after the agents details tab in the menu bar.
- Find the product under the inactive menu and select with left mouse click (multiple can be selected holding down ctrl or shift key).
- Click the Activate Button to move these selected products in the Active menu.
- When finished please click the Save Product Configuration button.
Job and Appointment Navigation Menu
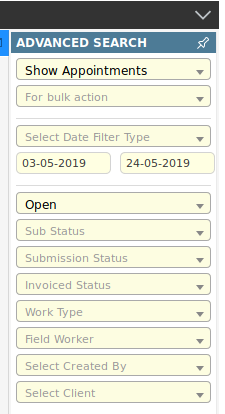
The Advanced search tool has been moved to right hand side of the browser window and can not be pinned/unpinned or toggled.
Two new status fields been created ‘Submission Status’ and ‘Invoiced Status’.
To search for appointments that have a submission
- Leave the status as Open.
- Change Submission status to ‘All’.
- Click search.
To search for appointments not have a submission:
- Leave the status as Open.
- Change Submission status to ‘Not Submitted’.
- Click search.
To search for appointments that have a RCTI/Client invoice:
- Leave the status as Open.
- Change Submission status to ‘All’.
- Click search.
To search for appointments that not have any invoices:
- Leave the status as Open.
- Change Submission status to ‘Not Invoiced’.
- Click search.
Email Sender address Verification.
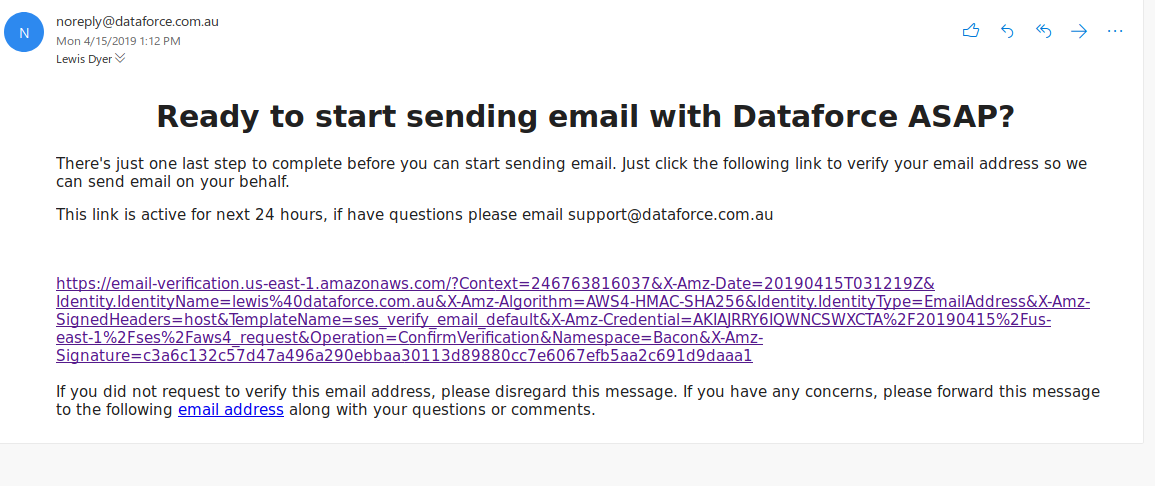
For Dataforce ASAP to send email on your behalf we are required by our email provider ‘Amazon Web Services’ to verify that we have permission. This is done through a verification email which is sent when an operator enters the address into Dataforce ASAP for the first time and until this release this email has been send from amazon email address and has amazon branding.
We understand this can be confusing to explain to new agents and we made improvements, this email is now sent using a Dataforce email address and has Dataforce branding as shown below.
Update to Job Files screen
A new method to group Job files has been included in this release called File Folders and these folders are defined from the File Folder Management screen.
To review style changes please review the Job Files documentation page.
Changes to Dataforce ASAP Reports Screen
Minor re-design of Dataforce ASAP Reports section to standardize style and filter names used in various reports and removed the depreciated screen option to copy the reports contents to clipboard.
Decommission Updates
Operators can now filter out ‘Product Categories’ on the ‘Decommissioning Received’ screen. For example an operator can split the removed lamp(s) and the removed fitting(s).
New tab ‘Decommissioning’ has been added to installation appointments:
This screen show’s which Decommissioning and Recycling batches this appointment been included in.
Added the following additional fields to the Recycling screen.
- Reyclcing Invoice Number.
- Estimate/Expected Weight.
- File upload field for a Recycling Invoice.
- File upload field for a Recycling Receipt.
Miscellaneous Updates and Fixes
- Email Sent log now stores the email subject line, sender address and sender name.
- Added customer type and basic agent details as variables in email templates.
- Appointments of type NoShow and Callback will no longer affect the jobs transactions when they are completed.

