- If your company doesn’t have an active subscription, you’ll need to Contact Dataforce Services to arrange one.
- Below is a comprehensive guide to getting started with a new ASAP Pro Subscription, from the first login to creating a job.
Logging In
-
To log in to the system, enter the following address into your preferred internet browser application: https://asap.dataforce.com.au/asap.
-
You’ll see a screen asking for your client code.

-
The client code is located in the email received from DATAFORCE: An example of the email is as follows

-
Enter your client code into the box by clicking on it, typing the code, and pressing enter.
Tip: The client code will be automatically remembered for subsequent logins from the same location. -
After entering the client code and clicking Go, enter the username and password provided by your administrator.

Getting Access to the System
Once a new instance of the system is set up, Dataforce will provide an administrator account to a user within your business. This account can be used to create further user accounts. For details on setting up new user accounts, please refer to Managing Users.
Client Code
A client code is a unique code assigned to your company. If you don’t know your client code, please ask your administrator.
Resetting Your Password
If you forget your password or your account is locked, use the Forgot password? link under the login button to reset your password.

-
Enter your username into the username field and click on the
Reset Passwordbutton. An email will be sent to you containing a link to reset your password. -
After clicking on the link in the email, you will receive another email with your new temporary password.
-
Use this password to login, after which you’ll be asked to set a new password. Enter the temporary password into the old password field.
Terms of service
Before entering the dashboard Dataforce ASAP’s terms of service must be accepted.

Opening a Program

To open a program, left-click on the ASAP button at the bottom left of the screen. A menu will list programs that your account has access to. If successful, a new tab will open. You can open multiple tabs by repeating the above steps.
ASAP Navigation
Use the Nav-Tabs to learn about navigation in ASAP!
Advanced Search
You can utilize the advanced search bar to pinpoint appointments and jobs within a specified date range, allowing for filtering based on client, agent, fieldworker, work type, and status.
Task Bar Tabs
Navigating through the task bar employs a straightforward point-and-click approach, demonstrated in the gif provided below allowing you to locate important screens such as Agent and Fieldworker Register, in less than a few clicks.
Search By ID
To search by ID, simply click on the search bar and input the desired ID or conduct a wildcard search using the * (asterisks).

Updating Your Agent Configuration
Navigate to Admin Agent Register and confirm all details are correct.
For further details see: Adding and Modifying an Agent.
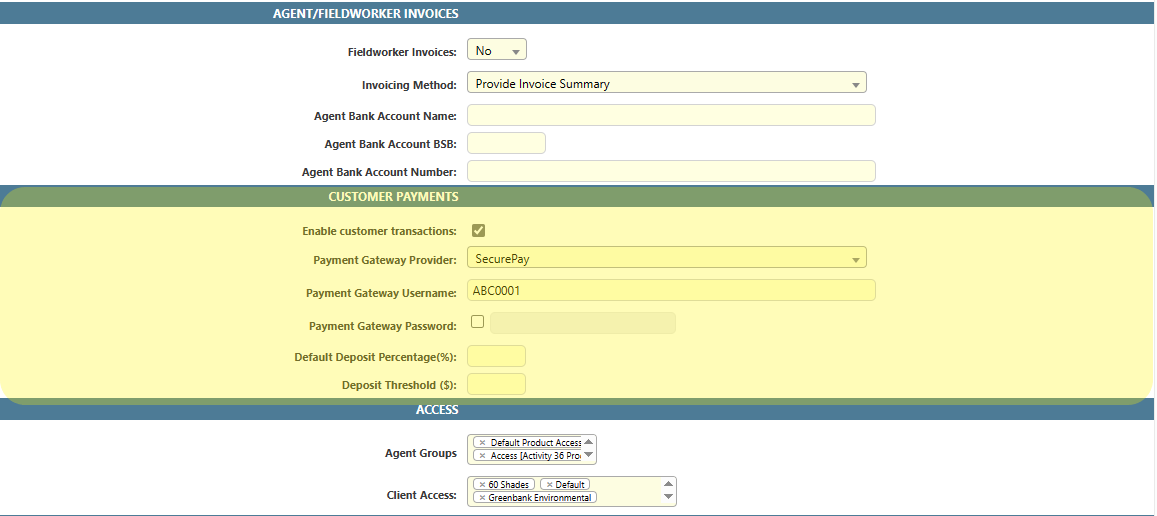
Enabling Credit Card Payments
To enable credit card payments via Runabout/ASAP, access the payment gateway settings. Supported gateways include:
- Securepay
- eWAY
- BPoint direct.
Save Details button.Configure Email Template Settings
Click on the ‘Email Templates’ tab in the agent details and configure your email templates as required.
Configure Your Products
Refer to Agent Products for more detail.
Navigate to the ‘Products’ tab within your agent record to activate the products you intend to use. For pricing customisation, establish product pricing groups and adjust prices as needed.
Set Up a Fieldworker
For a detailed guide, refer to ASAP documentation on Setting up a fieldworker
Navigate to Admin Fieldworkers Fieldworker Register and click on ‘Add fieldworker’.
Creating a Fieldworker
- Click Add Fieldworker
- You will be presented with this screen:
- Fill in the necessary details
- Click
Save Details

Setting up Email SPF/DKIM
This section is designed to make it easier for your IT team to add the DKIM & SPF records and ensure that emails are getting to your customers.
Why configure SPF and DKIM records?
SPF and DKIM records ensure that emails sent from Dataforce ASAP can use your own sender address. Without these records, there’s a high risk of emails being rejected or quarantined by the recipient’s email provider and not reaching them.
What are SPF and DKIM?
SPF and DKIM are email security measures. SPF confirms that a sender is authorized to send emails on behalf of a company. DKIM adds a digital signature to emails, further confirming their legitimacy. Both are set up in a domain’s DNS record.
Install Runabout
After creating a fieldworker, they will receive an email with instructions on how to install Runabout (mobile app).
Creating a Job
Refer to this guide on creating a job