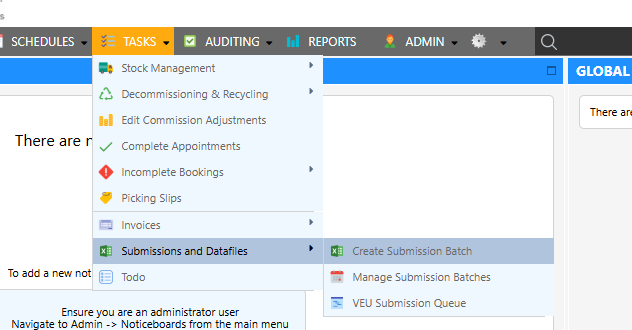
Starting a New Submission.
To begin a submission workflow:
- Navigate to the Create Submission Batch Page
Navigate to the screen, Tasks Submissions and Datafiles Create Submission Batch
- Select a Datafile and Status
-
Pick a datafile to view, there are two groups under the drop down titled ‘Non-Certificate’ and ‘Certificate’. To begin the submissions, choose a file under the ‘Certificate’ group.
-
Choose from the ‘Select Status’ dropdown the option Ready for Submission.
-
Select a Date Range and Audit Option
- (Optional) Enter an opening date and a closing date, this searches for appointments with their submission eligibility date between the values in the filters.
What date should pick as the starting date? Unless you have an specific period in mind, you should leave this field empty to ensure that you have picked up any older appointments that are ready for submission and have not been submitted yet.
Audit Status Field Before Dataforce ASAP processes a submission batch, it runs an audit requirements check. If this fails, the submission batch will not export. Using this option will prevent an audit requirements check, as only appointments that are audited (pass/waived/not required) will be included.
- Select Optional Filters
These can be used if you’re looking to create a submission batch for an individual Field Worker, individual agent or an individual activity.
- View, Download and Export Buttons
View the datafile by clicking the View Datafile button.
If you want the data in an excel format, click the Download Datafile button.
After you review the contents, it’s time to create a new submission batch by clicking the button Mark for Submission.
- Mark for Submission
Click the Mark for Submission button to create a submission batch.
This will lock the appointments into this submission batch and prevent them from being included in any other submission batch.
Screen Options Expanded.
Status Options
| Status | Description |
|---|---|
| Ready for Submission | Look for completed/audited and unbatched appointments based on submission eligibility date. |
| Submitted in Batch | Look for submitted appointments in a single batch from batch number, in the Submission Batch filter field. |
| Ready for Re-Submission | Look for completed/audited appointments that have a failed submission and need to be re-batched. |
| Scheduled Between | Look for completed/audited/submitted appointments by their scheduled date. |
| Activity Date Between | Look for completed/audited/submitted appointments by their Activity date. |
| Completed Between | Look for completed/audited/submitted appointments by their completed date. |
| Submitted - Not Yet Accepted | Look for submitted appointments that have not finished their submissions (still have a submission eligibility date). |
Button Description
| Button | Description |
|---|---|
| View Datafile | Open the result into the area below the buttons, this preview can be sorted and filtered. |
| Download Datafile | This will download the file as configured, either an excel file or a csv. |
| Download Forms | This will download any linked forms or file packs for appointments in the result set. |
| Mark for Submission | This will create a submission batch which will include all records in the result set. |
| Optional Filter | Description |
|---|---|
| Product | Install appointments with a particular product. |
| Client | Appointments assigned to a client. |
| Activity | Products that belong to an activity. |
| Field Worker | Filter by the appointment’s Field Worker. |
| Agent | Filter by the appointment’s Field Worker agent. |


