Overview
Dataforce ASAP has two user management screens. The first, the Dataforce ASAP user screen, which is used to create and assign ‘Program Access’ to a user. This is known as the Global Users screen, to open it you:
- Click on the Dataforce ASAP Start button on the bottom left of the screen.
- Select User Management from the menu popup.
The second Dataforce ASAP user screen is located inside a program, which is used to assign client and agent access. This is known as the Program Users screen, to open it you:
- Click on the Dataforce ASAP Start button on the bottom left of the screen.
- Open the Program you wish to set Agent and Client access on.
- Click the Admin Menu and select the ‘Users’ menu option.
Create A New User
Click the Add User button to begin, if you have selected a user from the grid, the button will have ‘Edit User.’ To clear the selected user you must hold the CTRL key and then click the grid again to clear the selected user.
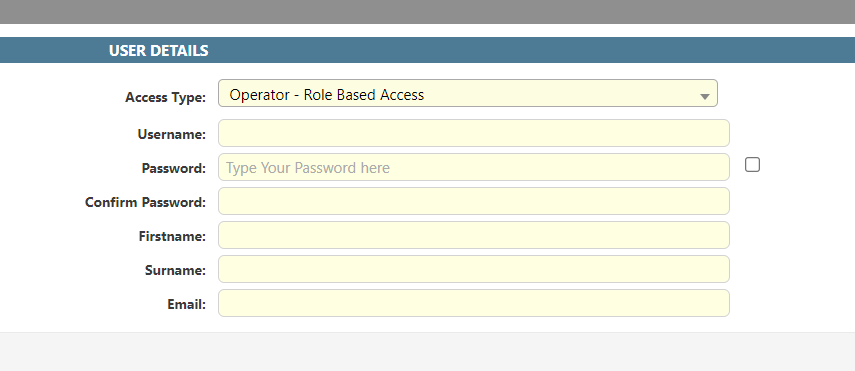
After you click the Add User button, you will see a screen similar to the below screen shot.
Basic User Details
Creating a new user requires the following details.
Access Level
There are a few options:
- Disabled.
- Operator - Role Based Access.
- Operator - Super User.
- API User (Read Only) (For API USER)
- API User (Read/Write) (For API USER)
If a setting is set to Disabled the user will no longer have access to Dataforce ASAP.
The Operator - Role Based Access will require this user to be given access via a Role, this setting is recommend for your office operators.
The Operator - Super User option is recommend for operators that control the systems configuration settings, like emails and customer forms.
The API User (Read Only & Read/Write) option is not recommend for operators
Username
The username field is entered by the user, along with their password. A good username is between 6-12 characters and it’s recommended that it has no spaces or special characters.
Password
Dataforce ASAP will rate your password and will only accept a good or strong password. A good password is at least 8 characters with a mixture of letters, numbers and one special character. Dataforce ASAP passwords do expire every 60 days. A user will be prompted to change their own passwords after expiry on their next login.
Firstname
Firstname is recommended for creating a new operator.
Surname
Surname is recommended for creating a new operator.
Emails are recommended for creating a new operator and is used for notifications.
Once these fields have been completed, please press the __Save Details__ button.
Edit User/Operator.
After the User details have been saved an Admin can edit the details of User/Operator they can assign Access for Dashboard, Program, Agents and Clients.
Dashboard
Admin has permisson to give following dashboard access to the operator.
Default Dashboard
The Default Dashboard that used see after log in.
Shared Dashboard
Shared Dashboard allows user/operator to access dashboards that created by other users.
Program Access
In the above example, we have two programs that a user can access.
The dropdown widget next to the program’s name contains a list of user roles.
If you select No Access then the program will not be listed on the Start button for this user.
Assign Access to Agents and Clients
This steps are only required for Roles that do not have the “Access All agents” or “Access all Client” options enabled. These users are generally third parties you have given access to, your operators should be given full access.
To assign each Program, navigate to the user editor by:
- Clicking the Dataforce ASAP start button and selecting a Program.
- Clicking the Admin Menu and selecting the Users option.
- Selecting the user from the data-grid and either double-clicking that grid-row or clicking the edit user button.
- You’re looking for the ‘Client Access’ or ‘Agent Access ‘ sections.
Select a primary agent and client as shown above if extra access is required use the ‘additional’ dropdowns too. Click the save button at bottom right of the screen to continue.
Disable a user
To retire a user account, you set the access level to Disabled. For an example, see the screen shot below
After making a change don’t forget to click the save button at bottom of the sceen.
We hide disabled users in the user data-grid, to see them you can click the checkbox at the top of the grid named Show Disabled Users and then click the Search button to refresh the grid.
To enable the user, set the access level option to a value other than disabled and if disabled for more than 60 days, we recommend a new password.
Reset Password
To change a password, you first must click the checkbox next to the password text field as shown below.
Now enter the new password into this field and the complete the confirm password field below.
Please click the save button on the bottom right of this tab.
Dataforce ASAP does not notify the user of a password change.
Unlock User Account
If a user has three successive failed attempts at login their accounts will be locked and they cannot login until an administrator has unlocked the account.
If an account is locked a new field appears (shown below) in the Edit Users screen.
To remove the lock you must click the checkbox and then click the save button on the bottom right of this tab.


