Processing a Submission
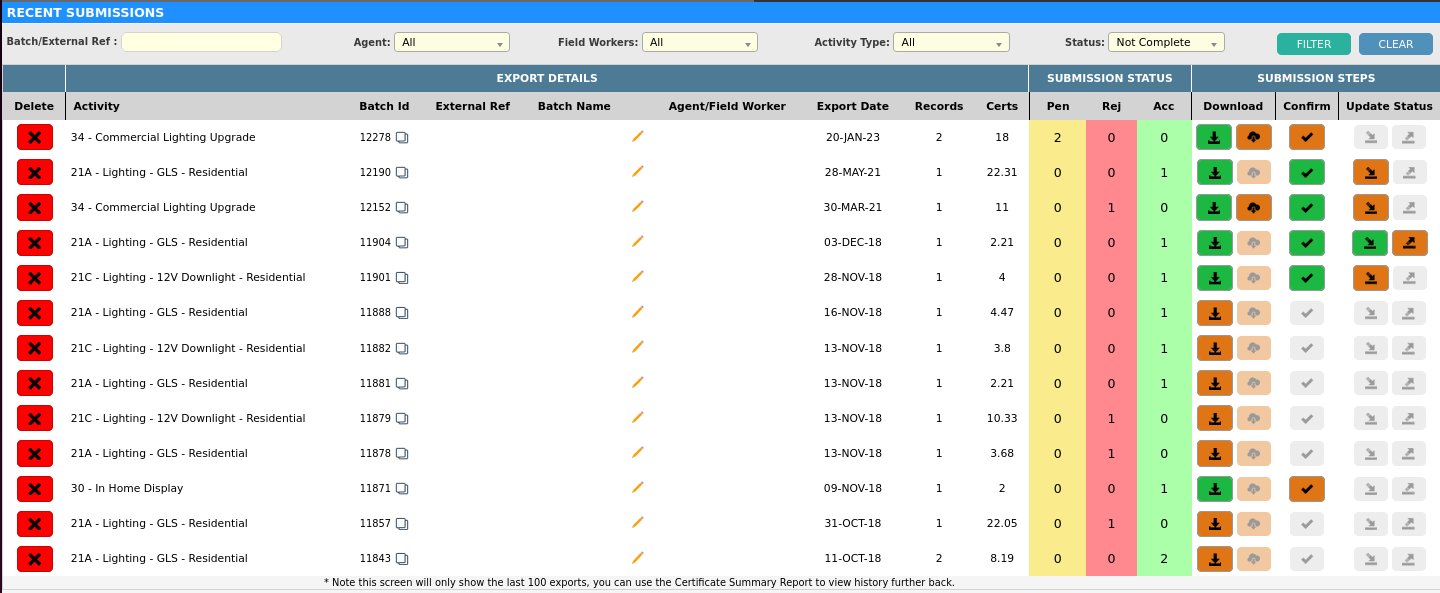
To review your recent export batches, navigate to Tasks > Datafile and Submissions > Recent Submissions.
This screen lists the last 100 submissions that have not been completed. A completed batch is when there are no pending certificates where the value of the ‘Pen’ column is zero.
Filter Bar
To view a single batch you can enter the batch number into the ‘Batch Number Field’ and then click the filter button. The grid below will return the result for only this batch. To view recently completed batches, you can change the ‘Status’ filter to the value Complete and then click the filter button.
The Agent filter will return batches exported for the selected agent, while the Field worker filter will do the same for a single Field Worker. Please note that a certificate batch is linked to an agent or Field Worker, if the batch was created while you had a Field Worker or agent from the filters selected.
Certificate Processing Workflow
| Column Name | Description |
|---|---|
| Delete | Will Reverse batch. |
| Activity | Name of the Datafile Exported. |
| ExternalRef | External Identifier number of the batch. |
| Batch Name | A description for this batch . |
| Agent/Field worker | The Field worker or Agent this batch exported on. |
| Export Date | The Creation date of the batch. |
| Records | Number of certificates lines (not Qty) in batch. |
| Certs | Qty of the certificates in batch. |
| Pen | Number of Pending cert lines. |
| Rej | Number of Rejected cert lines. |
| Acc | Number of Accepted cert lines. |
| Download | Download csv/excel of batch or Forms/Filepacks |
| Confirm | Confirm batch submitted to Authority. |
| Update Status | Download/Upload the Response File |
To process a submission batch you must go through the steps 1 to 4.
Step 1 allows you to download the export file from Datafile and Submissions screen.
Step 2 is a confirmation that this batch has been exported to a certificate authorities portal.
Step 3 will download a response file for this batch, this file is in a CSV (Comma Separated List) format which can be opened in Excel. Below is an outline of the columns in this file
Step 4 will navigate you to the response file upload screen, where you can upload this completed response file.
To complete a response file
File Columns
| Column | Description | Required ? |
|---|---|---|
| Datafile / Datafile Reference | Name of the Export File and database reference. | Do not Change |
| Work Activity | Database id of the exported work activity (if activity export). | Do not Change |
| Product Attribute | The Value of the product attribute exported. | Do not Change |
| Appointment Id | Dataforce ASAP appointment number for this certificate. | Do not Change |
| Batch Number | Certificate submission batch number. | Do not Change |
| Export date | Date the batch was exported. | Do not Change |
| Custom1..CustomX | The columns that can be included from the exported file. | Do not Change |
| Authority Response Status | If the certificate is accepted/rejected/pending. | Required |
| Submitted Date | Date the submission was made. | Required |
| Authority Response Message | Extra messages from the cert authority (reject reasons). | Optional |
| Registration ID | Identifier for the actual certificate. | Optional |
A response file has three sections with 7 columns (A-G), fixed with Dataforce ASAP, using these to identify the certificate when the file is uploaded.
The next section includes columns from the original export file and can be used to further identify the certificate. e.g customer name, company name. These columns are configured through the Datafile Columns Management screen.
The last section is for your operators to complete and provides the status of the certificate on the authority’s portal.
Completion Steps
- Find the certificate line in the file, using the columns on the left (the appointment number is the most helpful).
- Enter into the ‘Authority Response Status’ column, either the value ‘A’,’R’ or ‘P’ (Accepted/Rejected/Pending).
- Enter the date in the column ‘Submitted Date’, in the format dd/mm/yyyy.
- Optionally, enter a message that’s less than 255 characters into the column ‘Authority Response Message’.
- Optionally, enter an id less than 100 characters into the column ‘Registration ID’.
- Save the file as a CSV format. Do not let Excel change the files format.
Response file Q&A
Q: Can I upload a response file again?
A: Yes you can upload a response file again, if the appointments are not in a submitted status, those certificates will be skipped over.
Q: Do I have to upload the whole response file?
A: No, for example you can remove appointments that are invoiced. Each certificate line is unique and is processed individually. Do not remove the two header lines.


