Overview
Once an appointment has been created, it can either be placed in a waiting list or scheduled to a Field Worker.
If an appointment is not scheduled, its status becomes Waiting, making it available from the waiting list.
The waiting list provides a number of helpful features including:
- Auto-Scheduling of multiple appointments.
- Manual / Smart scheduling of single appointments.
- Updating the Job Agent.
- Basic appointment Summary including activity time.
Waiting list Filters and Options
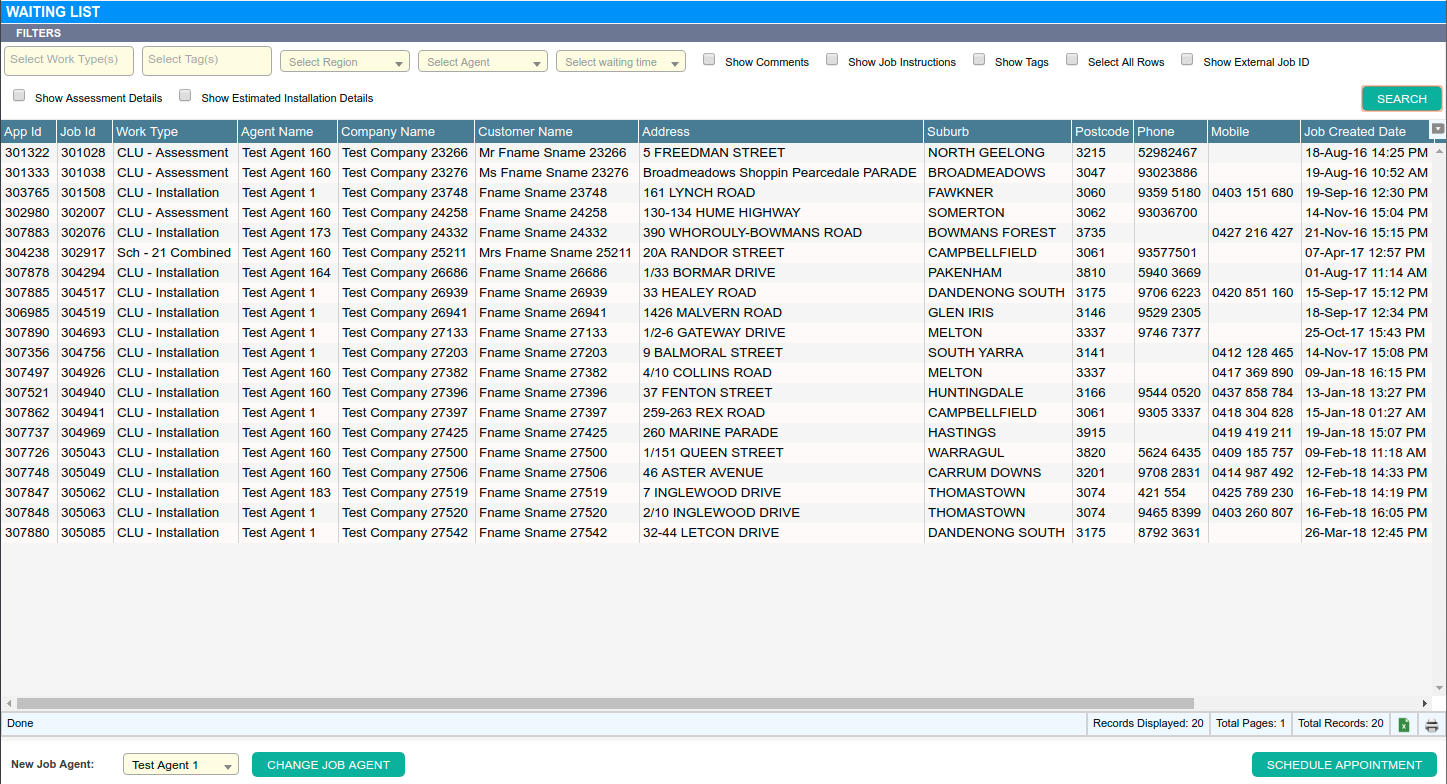
By default, the waiting list will display common appointment fields like:
- Customer Name
- Company Name
- Address
- Work Type of Appointment
- Job/Appointment Id
- Phone/Mobile
- Creation Dates and Waiting List Date.
Tip: The waiting list date is the date when the appointment was sent to the waiting list
Extra details are available if the checkboxes listed below are selected.
- Show Comments - Add a comments column to show the last Comment made by an operator.
- Show Job Instruction - Add a column that shows the Job Instruction made for the appointment.
- Show Tags - Add a column to show all the tags on the appointment.
- Show External Job Id - Add a column that has the external id assigned to the job e.g CRM number.
- Show Assessment Details - Add two columns, Assessment Field worker and Assessment Certificates.
- Show Estimated Install Time - Add a column showing the estimated installation time and a breakup of products in the assessment by their category.
Searching the waiting list
- Select Waiting List from the global menu.
- Select any filters to restrict appointments in the list.
- Select any additional columns required.
- Select Search.
Scheduling from the waiting list
There are two methods for scheduling appointments from the waiting list.
- Scheduling a single appointment.
- Scheduling multiple appointments using the bulk Auto-Scheduler.
Schedule a Single Appointment
- Select Waiting List from the global menu.
- Select any filters to restrict appointments in the list.
- Select any additional columns required.
- Select Search.
- Select the required appointment from the gird.
- Either double click the grid line, or select the button on the bottom right titled Schedule Appointment.
- Select Actions on the appointment toolbar (grey).
- Schedule the appointment using either the smart or manual schedulers.
Schedule Multiple Appointments using Auto Scheduler
- Select Waiting List from the global menu.
- Select any filters to restrict appointments in the list.
- Select any additional columns required.
- Select Search.
- Select the required appointments from the gird, hold down the CTRL key to select multiple appointments.
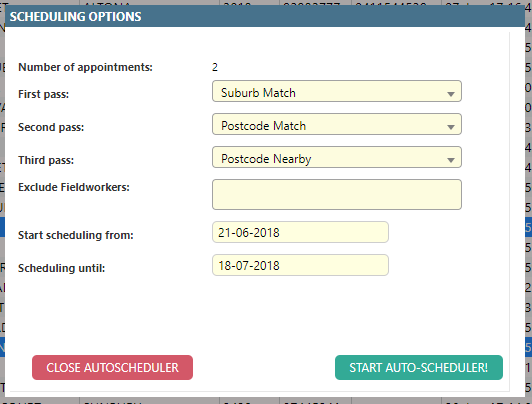
- Select Auto-Schedule Selected Appointments at the bottom right of the screen.
- Select options for the first, second and third pass.
Note: A pass simply means Dataforce ASAP will attempt to schedule all selected appointments with the method selected.
If any appointment’s could not be scheduled using the selected method, the scheduling process is re-attempted with the second pass method
- Select any Field Workers that should be excluded from the scheduling process.
- Select the date range over which the appointments should be scheduled.
- Select Start Auto-scheduler.
Changing the Job Agent on an appointment
- Select Waiting List from the global menu.
- Select any filters to restrict appointments in the list.
- Select any additional columns required.
- Select Search.
- Select the required appointments from the gird, hold down the CTRL key to select multiple appointments.
- Select the New Job Agent at the bottom left of the screen.
- Select the button titled Change Job Agent at the bottom left of the screen.


