To enable the SPV feature in your Dataforce ASAP instance, your system must first be configured correctly. The instructions below outline the steps required to enable Solar Panel Verification.
Step 1: Prepare your system for SPV
Before SPV validation can be turned on, there are a few preparation steps that must be completed.
- Create a new question which will be used to enable/disable SPV when completion of a job.
- Click on (Configuration icon) ‘Questions’ ‘Question Management’
- Create a new question with the following settings (Refer to Creating a Question for details on how to create a question):
- Question Type: Appointment
- Input Type: Radio
- Question: ‘Do you want to validate the panels using SPV (Solar Panel Validation)?’ (or something similar)
- Mandatory: Yes
- Under the Requirements tab, select any relevant requirements to ensure this question will be visible on any solar installation work types
- Under the Answers tab, create 2 answers, “Yes” and “No”
- If you do not already have a question to capture a customers NMI number for a solar installation then, create a new question with the following settings (Refer to Creating a Question for details on how to create a question):
- Question Type: Appointment
- Input Type: Text
- Question: ‘What is your NMI (National Meter Identifier) number?’ (or something similar)
- Mandatory: Yes
- Under the Requirements tab, select any relevant requirements to ensure this question will be visible on any solar installation work types
- Ensure you have created a Field Worker Attribute for recording a fieldworkers ‘CEC Accreditation number’.
- Ensure you collect each of the following photo evidence in your workflow (used when creating a submission).
- Street photo of property.
- Photo Panel serial number.
- Photo installed panels from street.
- Photo installed inverter.
- Photo dc isolator.
- Ensure you have created a product category for Solar Panel products
- In the top navigation menu, Click on Admin Products Product/Question Categories
- Enter ‘Solar Panel Module’ into the Name field
- Select ‘Product’ in the Category Type field
- Click Add Category
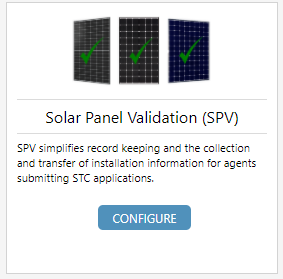
Step 2: Enable Solar Panel Validation
Since SPV is an optional feature in Dataforce ASAP, it needs to be manually enabled. Due to the way in which ‘Integrations’ work, integrations must be enabled for each agent individually. This also allows you to specify different Integration settings for each agent.
To enable the SPV integration for an agent:
- Click on (Configuration icon) Integrations
-
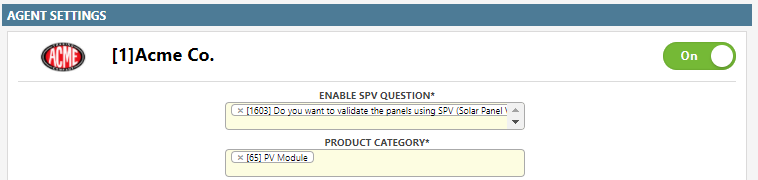
You will see a list of available integrations. Click on the ‘Configure’ button in ‘Solar Panel Validation (SPV)’
-
Change the toggle switch to the ‘On’ position to enable SPV for each agent that requires SPV.
-
Set values for each of the configuration options
Field Type Description Enable SPV Question The question which will be used to enable SPV for a job. This question should be a Yes/No radio question Panel Serial Number Question The question which will be used scan the panel serial numbers. Enable SPV Question The question which will be used to enable SPV for a job. This question should be a Yes/No radio question NMI Appointment Question A non block appointment question that contain the NMI of the property. Panel Category Product Category The product category that will be used for Solar Panel Modules. Inverter Category Product Category The product category that will be used for Inverter Modules. Battery Category Product Category The product category that will be used for Battery Modules. Inverter Series Attribute Product Attribute The product attribute for the Series of the Inverter. Panel Nominal Power (kwp) Attribute Product Attribute The product attribute in panel for Nominal Power in (kwp). CEC Accreditation number Fieldworker Attribute A fieldworker attribute that holds the installers CEC Accreditation Number. Photo Categories Data Category These Street photo of property, Photo Panel serial number, Photo installed panels from street, Photo installed inverter, Photo dc isolator, are used to create an xml submission payload. Deeming Period Calculation Modifier Group A Certificate Modify Group that applies the deeming calculation Modifier.
Step 3: Configure a new SPV tab on Runabout
To enable SPV for a work type on Runabout follow these steps:
- Click on (Configuration icon) Runabout
- For each Solar installation work type:
- Select the work type from the Select the Work Type to configure list
- Click Add New Tab
- Enter ‘Solar Panel Validation’ in the Tab Name field
- Enter a sort value to determine where the tab will appear
-
Select ‘Solar Panel Validation’ in the Tab Type field
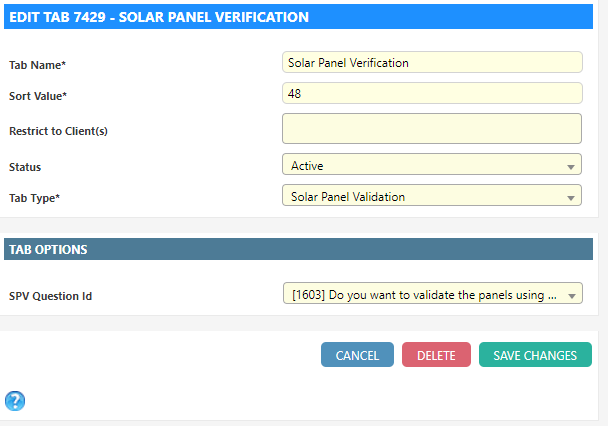
- Select the question that will be used to enable SPV for a job. This question should be a Yes/No radio question
Step 4: Configure your products for SPV
Before panel products can be verified using SPV, complete the following steps:
- In the top navigation menu, Click on Admin Products Product Register
- For each Solar Panel product:
- Select the product and click Edit Product or double-click on the product
- Ensure the Product Category matches the Product Category created in Step 1(f).
- Scroll down and click on ‘Save Changes’ in the bottom right of the screen
- Click on the ‘Solar Panel Validation’ tab on the product
-
Assign a Manufacturer and Supplier for a specific date range to the product. This determines which Verification Service Provider to use for serial number validation for this product.
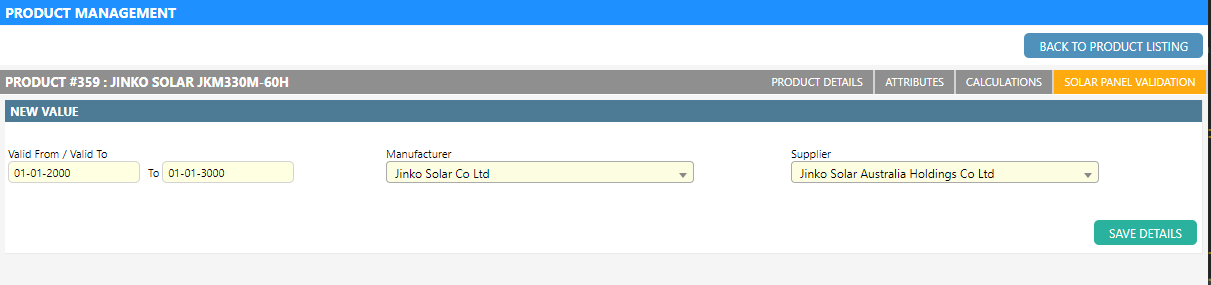
- Click ‘Save Details’
Step 5: Setup datafile
Dataforce will create two new datafiles, SPV Step 1 and SPV Step 2, your existing datafile remains for non-SPV jobs.
The first file is used to create the submission batch in ASAP, the second file is mirror of existing SPV Datafile with fields hidden (required when using sign data package) and will return one row per sign data package, we have new package for each panel area in the job.